背景
最近遇到需要基于Qt调用python脚本的场景,所以研究了一下,特此记录。
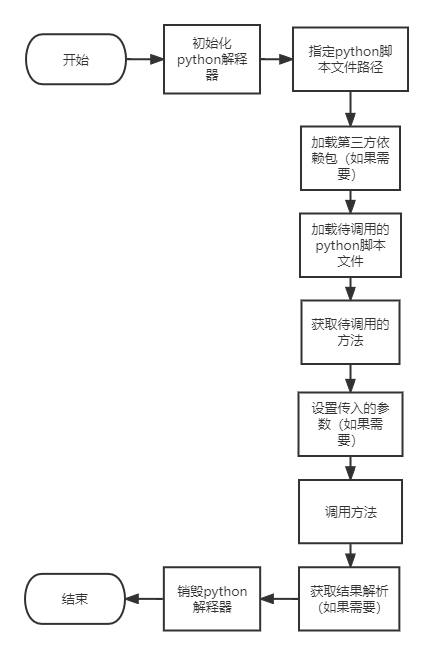
大概流程
运行环境
Windows11 x64
Qt6 6.3.1
Python-3.10.7
集成步骤
基于Qt创建一个CMakeLists项目
创建项目qt-python-demo。
引入python相关的依赖
找到你本机python安装的目录,我本机是在C盘。
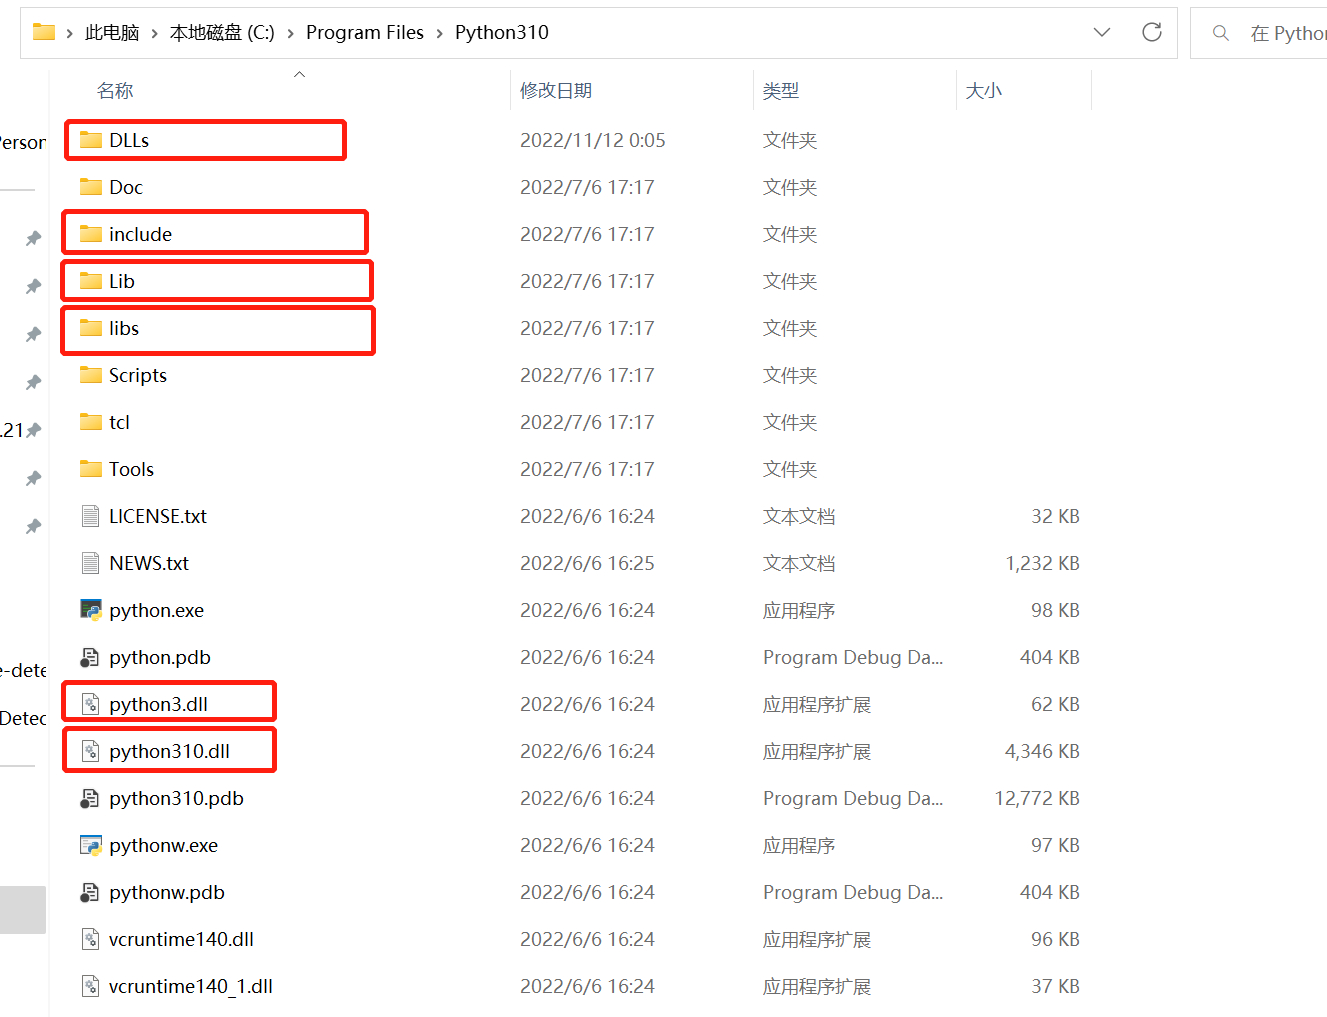
在项目根目录下创建文件夹python,将上述红框标注的文件夹复制到此文件夹下。
libs目录下,复制文件python310.lib命名为python310_d.lib,Debug模式运行时需要。
配置CMakeLists
set(PY_INCLUDE_DIR ${PROJECT_SOURCE_DIR}/python/include)
set(PY_LIB_DIR ${PROJECT_SOURCE_DIR}/python/libs)

include_directories(${PY_INCLUDE_DIR})
link_directories(${PY_LIB_DIR})

file(GLOB PY_DEPENDENCY_DIR ${PROJECT_SOURCE_DIR}/python/*.dll ${PROJECT_SOURCE_DIR}/python/DLLs ${PROJECT_SOURCE_DIR}/python/Lib)
file(COPY ${PY_DEPENDENCY_DIR} DESTINATION ${PROJECT_BINARY_DIR})
配置python脚本存放文件夹
1)在项目根目录下创建文件夹pyscripts,后继需要C++调用的python脚本就放在这里。
2)配置CMakeLists
file(GLOB PY_SCRIPTS ${PROJECT_SOURCE_DIR}/pyscripts)
file(COPY ${PY_SCRIPTS} DESTINATION ${PROJECT_BINARY_DIR})
配置python脚本第三方包依赖
1)在项目目录python/下创建文件夹site-packages,python脚本依赖的第三方包放在此文件夹下,后面有案例说明。
2)配置CMakeLists
file(GLOB PY_SITE_PACKAGES ${PROJECT_SOURCE_DIR}/python/site-packages)
file(COPY ${PY_SITE_PACKAGES} DESTINATION ${PROJECT_BINARY_DIR})
案例
C++在调用python脚本的时候,有返回值和无返回值在使用上还是存在一些区别,有返回值使用方法PyObject_CallObject,无返回值使用方法PyObject_CallFunction。
调用无参无返回值Python脚本
1)创建python脚本mytest.py并将其放在文件夹pyscripts下
def execWithoutParamAndResultMethod():
print("exec without param and result method success.")2)创建类PythonScriptHandler
pythonscripthandler.h
#ifndef PYTHONSCRIPTHANDLER_H
#define PYTHONSCRIPTHANDLER_H

#include <QObject>
#include <QDebug>
#include <QCoreApplication>
#include <QException>

#pragma push_macro("slots")
#undef slots

#define PY_SSIZE_T_CLEAN
#include <Python.h>

#pragma pop_macro("slots")

class PythonScriptHandler : public QObject
{
    Q_OBJECT
public:
    PythonScriptHandler();
    ~PythonScriptHandler();
    void execWithoutParamAndResult();
};

#endif // PYTHONSCRIPTHANDLER_H
pythonscripthandler.cpp
#include "pythonscripthandler.h"

PythonScriptHandler::PythonScriptHandler(){
}

PythonScriptHandler::~PythonScriptHandler(){
}

void PythonScriptHandler::execWithoutParamAndResult() {
    try {
        if(!Py_IsInitialized()) {
            //python环境的初始化
            Py_Initialize();
        }

        //初始化python系统文件路径
        PyRun_SimpleString("import sys");
        PyRun_SimpleString("sys.path.append('./pyscripts')");

        //加载待调用的python脚本文件
        PyObject *pModule = PyImport_ImportModule("mytest");
        if(pModule == NULL){
            return;
        }

        //加载调用的函数
        PyObject *pFunction = PyObject_GetAttrString(pModule, "execWithoutParamAndResultMethod");
        if(pFunction == NULL) {
            return;
        }

        //执行函数
        PyObject_CallFunction(pFunction, NULL);
    } catch(const QException& e) {
        qDebug() << e.what();
    } catch(std::exception e) {
        qDebug() << e.what();
    }

    if(Py_IsInitialized()){
        //python环境的销毁,与Py_Initialize()对应
        Py_Finalize();
    }
}
3)构建执行,查看结果

调用有参有返回值Python脚本
1)在mytest.pypython脚本中添加方法execWithParamAndResult
def execWithParamAndResult(a, b):
return a + b2)在pythonscripthandler.h添加方法声明execWithParamAndResult
class PythonScriptHandler : public QObject
{
    Q_OBJECT
public:
    PythonScriptHandler();
    ~PythonScriptHandler();
    void execWithoutParamAndResult();
    void execWithParamAndResult();
};3)pythonscripthandler.cpp方法实现
void PythonScriptHandler::execWithParamAndResult() {
    try {
        if(!Py_IsInitialized()) {
            //python使用环境的初始化
            Py_Initialize();
        }

        //初始化python系统文件路径
        PyRun_SimpleString("import sys");
        PyRun_SimpleString("sys.path.append('./pyscripts')");

        //加载待调用的python脚本文件
        PyObject *pModule = PyImport_ImportModule("mytest");
        if(pModule == NULL){
            return;
        }

        //加载调用的函数
        PyObject *pFunction = PyObject_GetAttrString(pModule, "execWithParamAndResult");
        if(pFunction == NULL){
            return;
        }

        //需要传入的参数
        PyObject *pArgs = PyTuple_New(2);
        PyTuple_SetItem(pArgs, 0, Py_BuildValue("i", 3));
        PyTuple_SetItem(pArgs, 1, Py_BuildValue("i", 4));

        //调用函数
        PyObject *pReturn = PyObject_CallObject(pFunction, pArgs);
        if(pReturn == NULL){
            return;
        }

        //解析结果
        int nResult;
        PyArg_Parse(pReturn, "i", &nResult);
        qDebug() << "exec result: " << nResult;
    } catch(const QException& e) {
        qDebug() << e.what();
    } catch(std::exception e) {
        qDebug() << e.what();
    }

    if(Py_IsInitialized()){
        //python环境的销毁,与Py_Initialize()对应
        Py_Finalize();
    }
}
4)构建执行,查看结果

调用依赖第三方包的Python脚本
1)在mytest.pypython脚本中添加方法execWithParamAndResultAndDependOtherLib
import json

import numpy as np


def execWithParamAndResultAndDependOtherLib(a, b):
    res = np.ones([a, b])
    return json.dumps(res.tolist())
2)复制python包依赖
复制numpy到文件夹site-packages下面,可以到你本地的python存放包的地方找,也可以新建一个demo项目,引入就可以得到了。

3)在pythonscripthandler.h添加方法声明execWithParamAndResultAndDependOtherLib
class PythonScriptHandler : public QObject
{
    Q_OBJECT
public:
    PythonScriptHandler();
    ~PythonScriptHandler();
    void execWithoutParamAndResult();
    void execWithParamAndResult();
    void execWithParamAndResultAndDependOtherLib();
};4)pythonscripthandler.cpp方法实现
void PythonScriptHandler::execWithParamAndResultAndDependOtherLib() {
    try {
        if(!Py_IsInitialized()) {
            Py_Initialize();
        }

        QString appDirPath = QCoreApplication::applicationDirPath();

        //初始化python系统文件路径
        PyRun_SimpleString("import sys");
        PyRun_SimpleString("sys.path.append('./pyscripts')");

        //加载第三方依赖包
        QString pyPackagesPath = "sys.path.append('" + appDirPath + "/site-packages')";
        PyRun_SimpleString(pyPackagesPath.toLatin1().data());

        //加载待调用的python脚本文件
        PyObject *pModule = PyImport_ImportModule("mytest");
        if(pModule == NULL){
            return;
        }

        //加载调用的函数
        PyObject *pFunction = PyObject_GetAttrString(pModule, "execWithParamAndResultAndDependOtherLib");
        if(pFunction == NULL){
            return;
        }

        //需要传入的参数
        PyObject *pArgs = PyTuple_New(2);
        PyTuple_SetItem(pArgs, 0, Py_BuildValue("i", 3));
        PyTuple_SetItem(pArgs, 1, Py_BuildValue("i", 4));

        //调用函数
        PyObject *pReturn = PyObject_CallObject(pFunction, pArgs);
        if(pReturn == NULL){
            return;
        }

        //解析结果
        char *nResult;
        PyArg_Parse(pReturn, "s", &nResult);
        qDebug() << "exec result: " << nResult;
    } catch(const QException& e) {
        qDebug() << e.what();
    } catch(std::exception e) {
        qDebug() << e.what();
    }

    if(Py_IsInitialized()){
        //python环境的销毁,与Py_Initialize()对应
        Py_Finalize();
    }
}
5)构建执行,查看结果

Py_BuildValue()使用说明
可以使用此函数构造python中的值,下面是一些例子(左侧是调用,右侧是Python值结果)(摘自python官方文档):
Py_BuildValue("")                        None
Py_BuildValue("i", 123)                  123
Py_BuildValue("iii", 123, 456, 789)      (123, 456, 789)
Py_BuildValue("s", "hello")              'hello'
Py_BuildValue("y", "hello")              b'hello'
Py_BuildValue("ss", "hello", "world")    ('hello', 'world')
Py_BuildValue("s#", "hello", 4)          'hell'
Py_BuildValue("y#", "hello", 4)          b'hell'
Py_BuildValue("()")                      ()
Py_BuildValue("(i)", 123)                (123,)
Py_BuildValue("(ii)", 123, 456)          (123, 456)
Py_BuildValue("(i,i)", 123, 456)         (123, 456)
Py_BuildValue("[i,i]", 123, 456)         [123, 456]
可能会遇到的问题
1)在DEBUG模式下,可能会报python310_d.lib无法找到。
可以复制一份python310.lib,重命名为python310_d.lib即可。
2)python脚本无法正确执行。
python中某个依赖包可能会存在相关的其他依赖,都需要拷贝进来,否则可能就会执行失败,比如skimage、opencv等依赖包。
3)打包到另外一台机器执行的时候可能会报Qt6Cored.dll找不到。
为了解决此问题,Qt为我们提供了一个工具windeployqt.exe,方便我们打包的时候将Qt相关的依赖都加入进来,可以在CMakeLists文件中进行配置:
get_target_property(qmake_exec_filepath Qt6::qmake IMPORTED_LOCATION)
get_filename_component(qt_exec_bin_dir ${qmake_exec_filepath} DIRECTORY)
find_program(windeployqt_exec_filepath windeployqt HINTS ${qt_exec_bin_dir})
add_custom_command(TARGET ${PROJECT_NAME} POST_BUILD
    COMMAND ${CMAKE_COMMAND} -E env PATH="${qt_exec_bin_dir}" "${windeployqt_exec_filepath}"
    "$<TARGET_FILE:${PROJECT_NAME}>"
    COMMENT "Running windeployqt...")
4)在初始化/销毁python解释器的时候,建议在C++的析构函数中执行销毁操作,方法中只需要检查是否需要初始化python解释器即可(遇到过如果在方法中初始化再销毁,再次调用方法的时候可能会存在些许问题)。
PythonScriptHandler::~PythonScriptHandler(){
    if(Py_IsInitialized()){
        Py_Finalize();
    }
}