之前展示一下demo,今天我们来看看是怎么实现的,首先海康官方的流程是如下图:
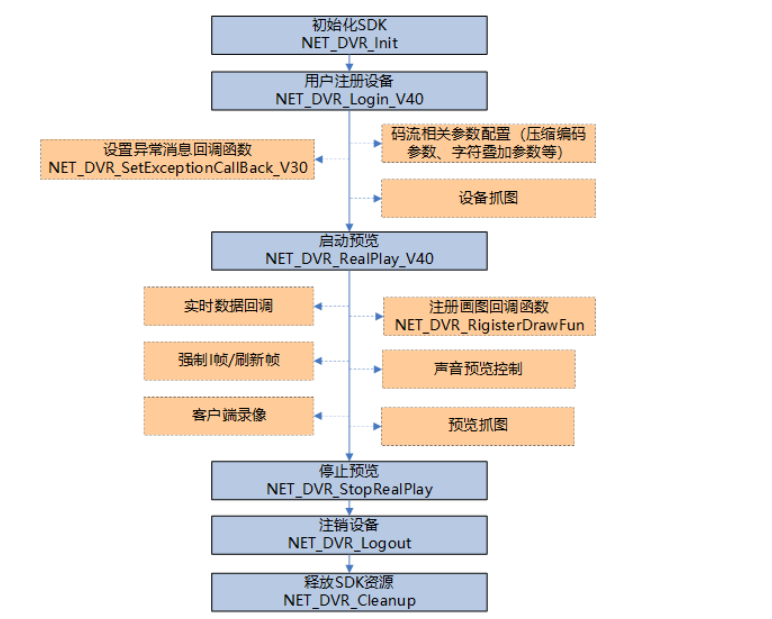
图中虚线框部分的模块是与预览模块相关,必须在启动预览后才能调用,这些模块之间是并列的关系,各自完成相应的功能。实时预览支持TCP、UDP、MULTICAST网络传输模式,应用层协议支持私有协议和RTSP协议,码流类型可以选择主码流、子码流、第三码流等。
其中官方预览实时流解码有两种方式:
方式1:预览接口NET_DVR_RealPlay_V40中预览参数的播放窗口句柄(hPlayWnd)赋值为有效句柄,则由SDK自动实现解码显示功能。在初始化SDK和注册设备两步骤后,直接调用启动预览和停止预览接口即可。正常开启预览之后可以调用NET_DVR_RigisterDrawFun注册画图回调函数(仅Windows版本支持),回调获取窗口DC,然后用户可以自己在窗口表层绘图或者写字。如果预览的码流是音视频复合流,也可以调用声音预览控制相关接口实现打开或者关闭声音、客户端音量控制等功能,相关接口有:NET_DVR_OpenSound、NET_DVR_CloseSound、NET_DVR_OpenSoundShare、NET_DVR_CloseSoundShare、NET_DVR_Volume等。
方式2:预览接口NET_DVR_RealPlay_V40中预览参数的播放窗口句柄(hPlayWnd)可以设置为空值,直接设置回调函数,或者调用预览接口之后,通过NET_DVR_SetRealDataCallBack、NET_DVR_SetStandardDataCallBack设置回调函数,回调获取实时流数据(前两个接口设置的回调获取的是PS封装的码流,后者获取的是标准RTP封装的码流)之后用户后续自己处理,比如二进制流方式写入文件保存成录像或者调用播放库解码显示等操作。
这一次我们用方式一来实现实时预览这个功能,首先登录初始化SDK,注册设备,代码如下:
  private void btnLogin_Click(object sender, System.EventArgs e)
 {
  if (textBoxIP.Text == "" || textBoxPort.Text == "" ||
                textBoxUserName.Text == "" || textBoxPassword.Text == "")
            {
                MessageBox.Show("Please input IP, Port, User name and Password!");
                return;
            }
            if (m_lUserID < 0)
            {

                struLogInfo = new CHCNetSDK.NET_DVR_USER_LOGIN_INFO();

                //设备IP地址或者域名
                byte[] byIP = System.Text.Encoding.Default.GetBytes(textBoxIP.Text);
                struLogInfo.sDeviceAddress = new byte[129];
                byIP.CopyTo(struLogInfo.sDeviceAddress, 0);

                //设备用户名
                byte[] byUserName = System.Text.Encoding.Default.GetBytes(textBoxUserName.Text);
                struLogInfo.sUserName = new byte[64];
                byUserName.CopyTo(struLogInfo.sUserName, 0);

                //设备密码
                byte[] byPassword = System.Text.Encoding.Default.GetBytes(textBoxPassword.Text);
                struLogInfo.sPassword = new byte[64];
                byPassword.CopyTo(struLogInfo.sPassword, 0);

                struLogInfo.wPort = ushort.Parse(textBoxPort.Text);//设备服务端口号

                if (LoginCallBack == null)
                {
                    LoginCallBack = new CHCNetSDK.LOGINRESULTCALLBACK(cbLoginCallBack);//注册回调函数
                }
                struLogInfo.cbLoginResult = LoginCallBack;
                struLogInfo.bUseAsynLogin = false; //是否异步登录:0- 否,1- 是

                DeviceInfo = new CHCNetSDK.NET_DVR_DEVICEINFO_V40();

                //登录设备 Login the device
                m_lUserID = CHCNetSDK.NET_DVR_Login_V40(ref struLogInfo, ref DeviceInfo);
                if (m_lUserID < 0)
                {
                    iLastErr = CHCNetSDK.NET_DVR_GetLastError();
                    str = "NET_DVR_Login_V40 failed, error code= " + iLastErr; //登录失败,输出错误号
                    MessageBox.Show(str);
                    return;
                }
                else
                {
                    //登录成功
                    MessageBox.Show("Login Success!");
                    btnLogin.Text = "Logout";
                }

            }
            else
            {
                //注销登录 Logout the device
                if (m_lRealHandle >= 0)
                {
                    MessageBox.Show("Please stop live view firstly");
                    return;
                }

                if (!CHCNetSDK.NET_DVR_Logout(m_lUserID))
                {
                    iLastErr = CHCNetSDK.NET_DVR_GetLastError();
                    str = "NET_DVR_Logout failed, error code= " + iLastErr;
                    MessageBox.Show(str);
                    return;
                }
                m_lUserID = -1;
                btnLogin.Text = "Login";
            }
            return;
}
上图是针对单个设备登录,如果要同时登录可以使用list将摄像头登录信息,放进去,循环读取。如下图:
 //这个list用来存放camera
public List<string> CameraList = new List<string>();

   public struct CAMERA1
        {
            public const string host = "www.unimker.tk";
            public const string port = "7001";
            public const string user = "admin";
            public const string pass = "root1234";
        }

        public struct CAMERA2
        {
            public const string host = "www.unimker.tk";
            public const string port = "7002";
            public const string user = "admin";
            public const string pass = "root1234";
        }


        public struct CAMERA3
        {
            public const string host = "www.unimker.tk";
            public const string port = "7003";
            public const string user = "admin";
            public const string pass = "root1234";
        }
//初始化方法调用login方法
public void InitCamera()
        {
            CameraList.Add("c1");
            CameraList.Add("c2");
            CameraList.Add("c3");
            //CameraList.Add("c4");

            Login("c1");
            Login("c2");
            Login("c3");

        }
//登录方法
public void Login(string CameraIndex)
        {

            CHCNetSDK.NET_DVR_USER_LOGIN_INFO loginInfo = new CHCNetSDK.NET_DVR_USER_LOGIN_INFO();
            string host = "";
            string port = "";
            string user = "";
            string pass = "";

            switch (CameraIndex)
            {
                case "c1":
                    host = CAMERA1.host;
                    port = CAMERA1.port;
                    user = CAMERA1.user;
                    pass = CAMERA1.pass;
                    break;
                case "c2":
                    host = CAMERA2.host;
                    port = CAMERA2.port;
                    user = CAMERA2.user;
                    pass = CAMERA2.pass; break;
                case "c3":
                    host = CAMERA3.host;
                    port = CAMERA3.port;
                    user = CAMERA3.user;
                    pass = CAMERA3.pass;
                    break;
            }


            //设备IP地址或者域名
            byte[] byIP = System.Text.Encoding.Default.GetBytes(host);
            struLogInfo.sDeviceAddress = new byte[129];
            byIP.CopyTo(struLogInfo.sDeviceAddress, 0);

            //设备用户名
            byte[] byUserName = System.Text.Encoding.Default.GetBytes(user);
            struLogInfo.sUserName = new byte[64];
            byUserName.CopyTo(struLogInfo.sUserName, 0);

            //设备密码
            byte[] byPassword = System.Text.Encoding.Default.GetBytes(pass);
            struLogInfo.sPassword = new byte[64];
            byPassword.CopyTo(struLogInfo.sPassword, 0);

            struLogInfo.wPort = ushort.Parse(port);//设备服务端口号

            if (LoginCallBack == null)
            {
                LoginCallBack = new CHCNetSDK.LOGINRESULTCALLBACK(cbLoginCallBack);//注册回调函数
            }
            struLogInfo.cbLoginResult = LoginCallBack;
            struLogInfo.bUseAsynLogin = false; //是否异步登录:0- 否,1- 是

            DeviceInfo = new CHCNetSDK.NET_DVR_DEVICEINFO_V40();

            //登录设备 Login the device
            LoginList.Add(CameraIndex, CHCNetSDK.NET_DVR_Login_V40(ref struLogInfo, ref DeviceInfo));
            int userId;
            LoginList.TryGetValue(CameraIndex, out userId);

            if (userId < 0)
            {
                iLastErr = CHCNetSDK.NET_DVR_GetLastError();
                str = "NET_DVR_Login_V40 failed, error code= " + iLastErr; //登录失败,输出错误号
                MessageBox.Show(str);
                return;
            }
            else
            {
                //登录成功
                MessageBox.Show("Login Success!");
            }
        }
因为是demo所以我就加了三个摄像头,实际场景中应该使用xml或者json格式的文件,进行摄像头配置循环读取。
接下来就是进行实时预览的功能,实时预览因为官方的demo都是单个预览,没有同时预览的功能,所以我们这个需要在设计器上再加上两个picturebox,三个picturebox同时预览,如下图: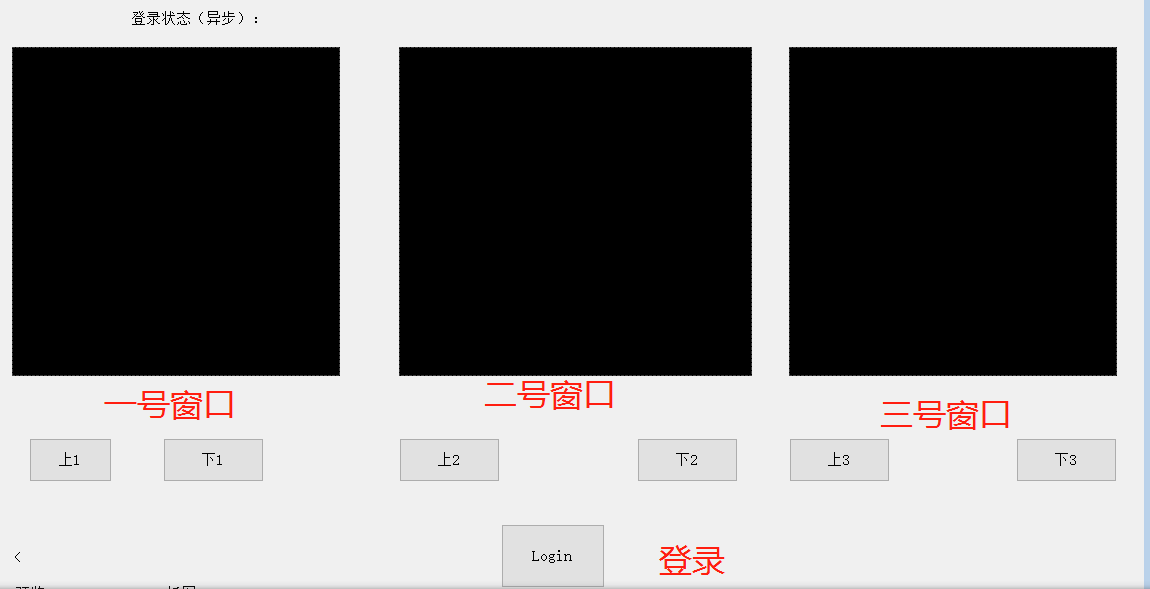
接下来再增加一个按钮,写一个按钮事件,来实现预览功能
// 字典用来存取当前picturebox预览列表
 public Dictionary<string, string> currentPreviewList = new Dictionary<string, string>();
//字典用来存放将要预览句柄的列表
public Dictionary<string, CHCNetSDK.NET_DVR_PREVIEWINFO> previewList = new Dictionary<string, CHCNetSDK.NET_DVR_PREVIEWINFO>();
//字典用来存放播放列表
public Dictionary<string, int> playList = new Dictionary<string, int>();
//字典用来存放临时预览的列表
 public Dictionary<string, CHCNetSDK.NET_DVR_PREVIEWINFO> temp_preview_list = new Dictionary<string, CHCNetSDK.NET_DVR_PREVIEWINFO>();
//字典用来存放临时播放的列表
public Dictionary<string, int> temp_play_list = new Dictionary<string, int>();
 private void button1_Click(object sender, EventArgs e)
        {
            preview("c1", RealPlayWnd);
            preview("c2", pictureBox1);
            preview("c3", pictureBox2);
            return;
        }
 //预览方法
public void preview(string CameraIndex, PictureBox picturebox)
        {
            int userId;
            LoginList.TryGetValue(CameraIndex, out userId);

            // 当前窗体将要播放的摄像头索引
            if (currentPreviewList.ContainsKey(picturebox.Name))
            {
                currentPreviewList[picturebox.Name] = CameraIndex;
            }
            else
            {
                currentPreviewList.Add(picturebox.Name, CameraIndex);
            }


            //CHCNetSDK.CameraIndex lpPreviewInfo = new CHCNetSDK.NET_DVR_PREVIEWINFO();
            CHCNetSDK.NET_DVR_PREVIEWINFO prHandle;

            previewList.Add(CameraIndex, new CHCNetSDK.NET_DVR_PREVIEWINFO());
            previewList.TryGetValue(CameraIndex, out prHandle);

            prHandle.hPlayWnd = picturebox.Handle;//预览窗口

           // if (m_lRealHandle < 0)
            //{

                prHandle.lChannel          = 1;//预te览的设备通道
                prHandle.dwStreamType      = 0;//码流类型:0-主码流,1-子码流,2-码流3,3-码流4,以此类推
                prHandle.dwLinkMode        = 0;//连接方式:0- TCP方式,1- UDP方式,2- 多播方式,3- RTP方式,4-RTP/RTSP,5-RSTP/HTTP
                prHandle.bBlocked          = false; //0- 非阻塞取流,1- 阻塞取流
                prHandle.dwDisplayBufNum   = 1; //播放库播放缓冲区最大缓冲帧数
                prHandle.byProtoType       = 0;
                prHandle.byPreviewMode     = 0;
                //lpPreviewInfo.byStreamID        = new byte[32];

                if (RealData == null)
                {
                   // RealData = new CHCNetSDK.REALDATACALLBACK(RealDataCallBack);//预览实时流回调函数
                }
                IntPtr ppuser = new IntPtr();
                int playHandle = CHCNetSDK.NET_DVR_RealPlay_V40(userId, ref prHandle, null/*RealData*/, ppuser);
                playList.Add(CameraIndex, playHandle);
                //CHCNetSDK.NET_DVR_RealPlay_V40(userId, ref prHandle, null/*RealData*/, ppuser);
                if (userId < 0)
                {
                    iLastErr = CHCNetSDK.NET_DVR_GetLastError();
                    str = "NET_DVR_RealPlay_V40 failed, error code= " + iLastErr; //预览失败,输出错误号
                    MessageBox.Show(str);
                    return;
                }
           // }

        }
现在点击登录已经可以预览三个摄像头了,如下图: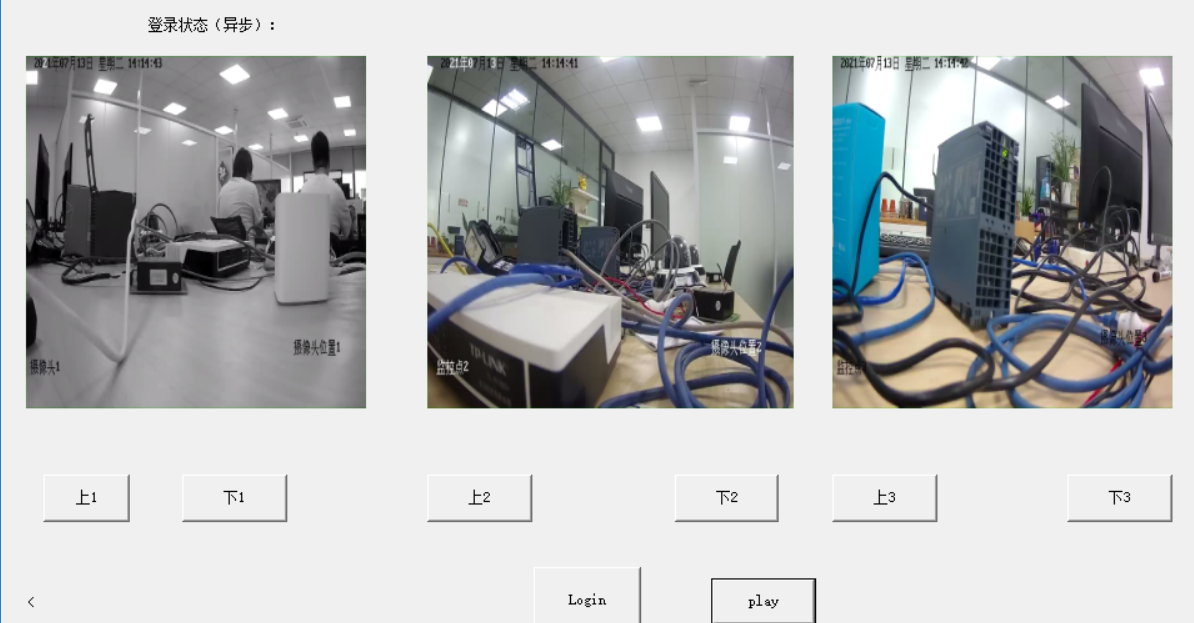
接下来我们需要实现切换当前每个播放窗口的播放画面,首先我在每个picturebox下增加了上和下两个按钮用来实现切换当前画面的功能,再给其加上click事件进行触发。
//切换播放画面
public void changeView(string currentCameraIndex, PictureBox currentPictureBox, string targetCameraIndex)
        {


            if (temp_play_list.ContainsKey(currentCameraIndex))
            {
                // stop
                int playHandle;
                temp_play_list.TryGetValue(currentCameraIndex, out playHandle);
//停止预览方法
                stopPreview(currentCameraIndex, currentPictureBox, true);

            }
            else
            {
                stopPreview(currentCameraIndex, currentPictureBox);
            }

            // 如果将要预览的摄像头不存在预览句柄,则直接在当前窗口预览
            if (!previewList.ContainsKey(targetCameraIndex))
            {
                preview(targetCameraIndex, currentPictureBox);
                return;
            }

            // 如果存在,并且没有在播放
            CHCNetSDK.NET_DVR_PREVIEWINFO prHandle;
            previewList.TryGetValue(targetCameraIndex, out prHandle);

            // 取出 targetCameraIndex 登录句柄
            int userId;
            LoginList.TryGetValue(targetCameraIndex, out userId);

            if (prHandle.hPlayWnd == null)
            {
                prHandle.hPlayWnd = currentPictureBox.Handle;

                IntPtr puser = new IntPtr();
                int playHandle = CHCNetSDK.NET_DVR_RealPlay_V40(userId, ref prHandle, null/*RealData*/, puser);
                if (playList.ContainsKey(targetCameraIndex))
                {
                    //update
                    playList[targetCameraIndex] = playHandle;
                    return;
                }
                playList.Add(targetCameraIndex, playHandle);
                return;

            }

            // 如果已经被其他的窗口播放
            tempview(targetCameraIndex,currentPictureBox);

            // 当前窗体将要播放的摄像头索引
            if (currentPreviewList.ContainsKey(currentPictureBox.Name))
            {
                currentPreviewList[currentPictureBox.Name] = targetCameraIndex;
            }
            else
            {
                currentPreviewList.Add(currentPictureBox.Name, targetCameraIndex);
            }

        }

//临时预览方法
        public void tempview(string CameraIndex, PictureBox picturebox)
        {

            int userId;
            LoginList.TryGetValue(CameraIndex, out userId);


            // 查找临时预览字典释放存在可用但已停止预览的预览句柄
            bool canUse = CheckTempPreviewList(CameraIndex);

            if (canUse)
            {

                CHCNetSDK.NET_DVR_PREVIEWINFO canUseHandle;
                temp_preview_list.TryGetValue(CameraIndex, out canUseHandle);
                canUseHandle.hPlayWnd = picturebox.Handle;

                IntPtr puser = new IntPtr();
                int tempPlayHandle = CHCNetSDK.NET_DVR_RealPlay_V40(userId, ref canUseHandle, null/*RealData*/, puser);
                if (temp_play_list.ContainsKey(CameraIndex))
                {
                    //update
                    temp_play_list[CameraIndex] = tempPlayHandle;
                    return;
                }
                temp_play_list.Add(CameraIndex, tempPlayHandle);
                return;
            }

            //CHCNetSDK.CameraIndex lpPreviewInfo = new CHCNetSDK.NET_DVR_PREVIEWINFO();
            CHCNetSDK.NET_DVR_PREVIEWINFO prHandle;

            temp_preview_list.Add(CameraIndex, new CHCNetSDK.NET_DVR_PREVIEWINFO());
            temp_preview_list.TryGetValue(CameraIndex, out prHandle);

            prHandle.hPlayWnd = picturebox.Handle;//预览窗口

            // if (m_lRealHandle < 0)
            //{

            prHandle.lChannel = 1;//预te览的设备通道
            prHandle.dwStreamType = 0;//码流类型:0-主码流,1-子码流,2-码流3,3-码流4,以此类推
            prHandle.dwLinkMode = 0;//连接方式:0- TCP方式,1- UDP方式,2- 多播方式,3- RTP方式,4-RTP/RTSP,5-RSTP/HTTP
            prHandle.bBlocked = false; //0- 非阻塞取流,1- 阻塞取流
            prHandle.dwDisplayBufNum = 1; //播放库播放缓冲区最大缓冲帧数
            prHandle.byProtoType = 0;
            prHandle.byPreviewMode = 0;
            //lpPreviewInfo.byStreamID        = new byte[32];

            if (RealData == null)
            {
                // RealData = new CHCNetSDK.REALDATACALLBACK(RealDataCallBack);//预览实时流回调函数
            }
            IntPtr ppuser = new IntPtr();
            int playHandle = CHCNetSDK.NET_DVR_RealPlay_V40(userId, ref prHandle, null/*RealData*/, ppuser);
            temp_play_list.Add(CameraIndex, playHandle);
            //CHCNetSDK.NET_DVR_RealPlay_V40(userId, ref prHandle, null/*RealData*/, ppuser);
            if (userId < 0)
            {
                iLastErr = CHCNetSDK.NET_DVR_GetLastError();
                str = "NET_DVR_RealPlay_V40 failed, error code= " + iLastErr; //预览失败,输出错误号
                MessageBox.Show(str);
                return;
            }
            // }

        }
   //停止预览,这里一定要先停止当前的预览的画面,再重新预览,否者系统内存会无限增加,直到溢出崩溃
       public void stopPreview(string CameraIndex, PictureBox picturebox, bool isTemplist = false)
        {
            int playHandle;

            if (isTemplist)
            {
                temp_play_list.TryGetValue(CameraIndex, out playHandle);
            }
            else
            {
                playList.TryGetValue(CameraIndex, out playHandle);
            }

            if (!CHCNetSDK.NET_DVR_StopRealPlay(playHandle))
            {
                iLastErr = CHCNetSDK.NET_DVR_GetLastError();
                str = "NET_DVR_StopRealPlay failed, error code= " + iLastErr;
                MessageBox.Show(str);
                return;
            }

        }

        private void button3_Click(object sender, EventArgs e)
        {
            string cameraIndex = scroll("c1", false);
            changeView("c1", RealPlayWnd, cameraIndex);
            //MessageBox.Show(cameraIndex);

        }

        private void button4_Click(object sender, EventArgs e)
        {
            string cameraIndex = scroll("c1");
            changeView("c1", RealPlayWnd, cameraIndex);

            MessageBox.Show(cameraIndex);
        }

        private void button8_Click(object sender, EventArgs e)
        {
            string cameraIndex = scroll("c3");
            MessageBox.Show(cameraIndex);
        }

        // 检索摄像头列表,返回当前摄像头索引的前一个或者后一个 cameraIndex
        public string scroll(string cameraIndex, bool isNext= true)
        {
            int Index = isNext ? CameraList.IndexOf(cameraIndex) + 1 : CameraList.IndexOf(cameraIndex) - 1;
            Index = Index < 0 ? CameraList.Count-1 : Index;
            Index = Index > CameraList.Count ? 0 : Index;
            return CameraList[Index];
        }

        private void button5_Click(object sender, EventArgs e)
        {
            string cameraIndex = scroll("c2", false);
            string lastPlayCameraIndex;
            currentPreviewList.TryGetValue(pictureBox1.Name, out lastPlayCameraIndex);

            changeView(lastPlayCameraIndex, pictureBox1, cameraIndex);
            MessageBox.Show(cameraIndex);
        }

        private void button6_Click(object sender, EventArgs e)
        {
            string cameraIndex = scroll("c2");
            string lastPlayCameraIndex;
            currentPreviewList.TryGetValue(pictureBox1.Name, out lastPlayCameraIndex);

            changeView(lastPlayCameraIndex, pictureBox1, cameraIndex);
            MessageBox.Show(cameraIndex);
        }

        private void button7_Click(object sender, EventArgs e)
        {
            string cameraIndex = scroll("c3", false);
            MessageBox.Show(cameraIndex);
        }
    }
接下来看一下,实现的效果如何,点击二号窗口的上一路按钮,如下图: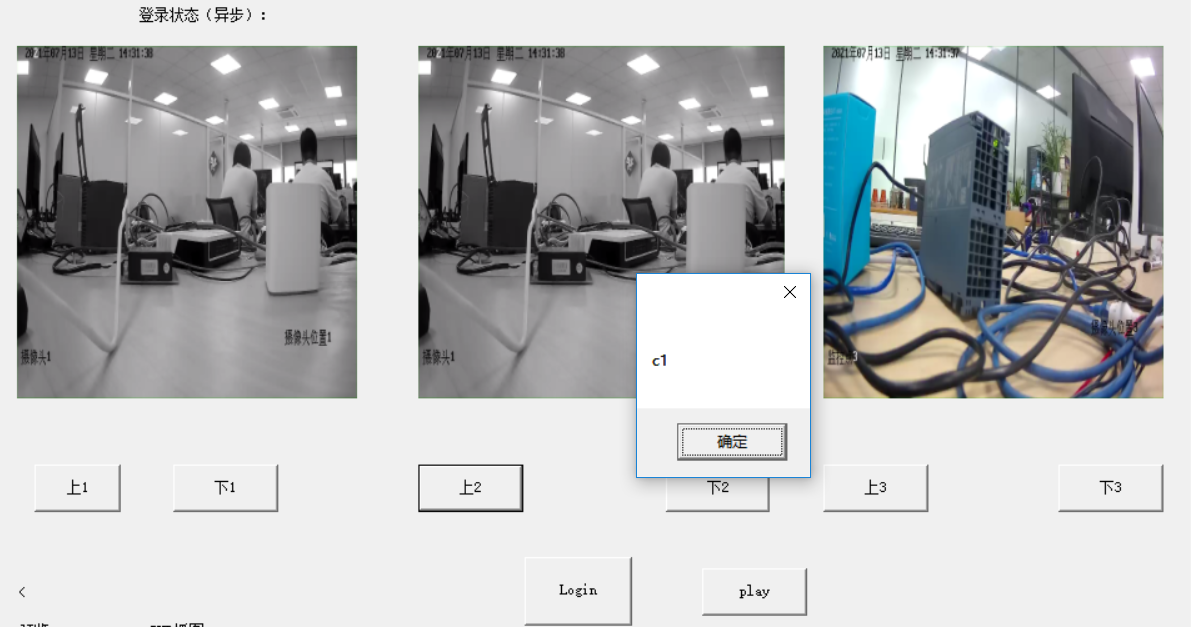
成功切换到摄像头1,并播放该画面。好了大概的demo已经完成,中间还有些别的问题,由于这篇文章太长,我就先不写了,大家看完如果有啥问题,可以问我。后面我会把demo完善好,再写几篇。